Friday, July 14, 2017

How to Write an Awesome Blog Post to Super Boost

There are some basic points and interesting tools to write a perfect article and almost all today's successful bloggers implement while they write their posts. In this post we are going to discuss all such things which will enable you to super boost your post contents and achieve a rising traffic of your blog always. Let discuss here that how you can write an awesome blog post for your target audience to catch their attention with simple and easy techniques.

Killer Tips for Blogpost Writing

Must Give Time to write a blog post and Don't Hurry

Consider every word of a post valuable asset for your project so Must Give Time to make your post attractive & productive for relevant audience and readers. So don't select meaningless contents or publish it haphazardly otherwise you must know that people will be ignore it. So think what readers are want to read and what is their choice so supply them the right products. Working on posts with full of attention and interest will obviously consume your time but at the same time it will save you to waste your precious time and energy for many unsuccessful posts that ultimately remained fail to achieve the goal of reaching and catching the attention millions of readers. So always think to make your blog post more sustainable and it is possible with a well start. I believe that posts and articles of most of leading and successful sites and blogs based on their unique quality and genuine content and mixing appropriate creativity and innovation which can give any post limitless opportunities to boost and to be on top in search engine results and like by target readers. " Maintain a balance while doing hardwork to achieve your dreams so always keep yourself healthy and happy to enjoy results of success". (Zaheer)


Continuity and Persistence

Never quit dear. Keep writing posts frequently, continuously and with persistence to get new readers as googlebot or other crawlers scan for new contents on the web time to time. So these search engines robots/spiders can list your website and update the new stuff if you are posting data, stories and articles or whatever according to your topic on regular basis. Obviously, if you publishing contents regularly you will be definitely successful to get more traffic and higher ranking for your website or blog by the time.

Selection of Topic

No one want to be in a quandary and always prefer unambiguous material. Therefore it is very important that you choose the best specific topic for a blog post that love by your audience so always dig out what they are searching or interested in? So to get the millions of readers always focus on to supply the contents and topics according to audience demand. Higher traffic depends on the right title and topics of a post and articles. To find out and understand the real demands of your target audience so read and respond their emails & comments and also go through some popular blogs and websites on the same topics and see what users are talking about and what they actually need. Once you finalized and listened the voice of heart of your readers you will be easily select a best topic and a unique title for your new blog post.

Research


Selection of topic by addressing the needs of your audience is also a part of research because you explore, read, talk with people, analyze all information and think scientifically to reach on a right path which enable you to choose a unique title for your topic that boost forever. Likewise you can strengthen your post or article by doing some research on the topic for example if you are writing on Education Standard of Medical Schools in Canada then you should include definition of word "standard education" add some facts & figures about numbers of schools, past achievements, number of qualified students, number of faculty members, name of international or national affiliations, interviews remarks by peoples in the same field, mention all sources that verify your content for example you are going to add number of Medical Schools listed in World Directory of Medical Schools then you should must mention their name or website which will give a healthy impact for your readers and they will bookmark and like to visit your blog again and again, you can recommend and refer some relevant websites, books or articles for your readers on the topic and many other more things can be added in your blog posts that catches the attention of your audience.

Start Writing as Draft 


Avoid unnecessary delays and do not get too late instead just start writing a post in draft format once you decided for that you read to give appropriate time with consistency and prepared your mind to write on a topic accordingly the choice of your audience. In blogger and wordpress post you can work online and save your work as draft and even you can choose a word document to write offline. You will see soon that by the passage of time you will be come to the end and will be able to publish your ever grow post with confidence.

Use of Images

A pictorial touch can give a new life to your post specifically explaining difficult topics or things that need to show as images. Keep in mind that some users search topics by images and when your every post have some good pictures will surely increase your website traffic. Must give title, alt text in properties of an image to make them familiar with search engines. 

Subscribe to Google Alerts

To get ideas and words about trending topics you should subscribe to Google Alert, its free and you will receive alerts in your email.

Social Media Sharing

Give social media sharing options like google +, facebook, Twitter, linkedin and other plate forms options so readers can share your post with their friends and family.

Tuesday, June 27, 2017

Write and Publish a New Blogger Post on Blogspot

Write and publish a new post on Google Blogger

In this post we will see how simple is creating a new post for blogger and then see how we can publish a written post. Moreover here you know that what type of content and post customization options are exist in the blogger and how we can share our posts on google+ profile in our circles and public. Moreover changing and editing, previewing, as draft saving, post labeling and categorize new or old blogger posts will be discussed. Advance features SEO Tools under post setting options will be explained alongwith line break and HTML customization. Keep in mind that to post on blogspot you must have a blog and we have already learned in our previous post "Make a free Blog on Blogspot Step by Step". If you don't have any blog just create it and then start writing new posts for your blog.

Signing in to Blogger to Write a New Post

To writing a new post on blogspot, you need to sign in first in blogger.com with your google gmail id and password. So go on www.blogger.com and see on the right side an option of Sign in will be displayed as showing in below image:

Sign in to Blogger

Login into your blog with your accurate gmail id and correct password and then click Sign in button as explained in below image:

Using gmail account ID and password to login into google account

Create a New Post in Blogger


Now with a message loading please wait.... The Dashboard or control panel of blogger will be open shortly. Here you see a button "New Post" on the top-left as displayed in below screen:

Button to create a New Post on Blogger

Giving Post Title and Typing contents in Blogger Post Body

A new window screen will be open after you click on New post button and we can say this is the main screen  where bloggers perform the most important work i.e. contents typing and publishing a post is usually. Here you choose a unique Post Title and type quality contents in Post Body up to 300 to 500 words. Using Keywords keeping in mind SEO standards will boost your posts. In the post body you can add videos, pictures and maps etc. Always give source name in case you want to include already published stuff. HTML option in blogger gives customization for the post and drawing bar with options like do, undo, font styles and size, headings, subheading, minor heading and normal text titles, text background and text color, Hyperlink, inserting picture, videos, inserting special character and jump break, text alignment, auto bullet and numbering, quote, remove formatting, checking spelling, Translate in other languages words typed phonetically in english, left to right and right to left text movement options make blogger more friendly. These options are almost same we use in Microsoft Office applications. 

How to give a post title and writing contents for a new blog post
Click here to view published post Preview

Blogger's Copyright Policy

As explained, don't use already published contents, pictures, videos without the permission of owners and remain update and don't post any material or contents violate blogger's policies like hate, violent content or crude are not recommended to post on blogger. Because blogger take it very serious and can take actions as per their content policies and terms of services. I will recommend to all bloggers to must go through these terms and polices apply on every blogger who use blogspot for their blogs and content publishing.

Publish a Blogger post without Google+ Profile

Once finish typing work for your post just Press Publish button then your post will be published  on internet and will be available with a URL link to access directly or when people on search contents on the google, yahoo, msn and other search engines, these published post links with some text of the post will be appeared in search results and if users seemed it relevant they will click on it and visit your blog post. Publishing a post without Google+ Profile is easy however not recommend if you really want to increase your users and blog traffic although this is an optional deal depends on blog admin's priorities and requirements. 


Note: You also use Save option if your work is not complete in one sitting and in this case your post will be saved as draft and when you complete work just press Publish to finally post your content.

Sharing Blogger Post on Google Plus 

There are a lot of advantages we recommend you to create and enable Google+ social networking profile which will give you sharing options of your blog post with Google+ community and many other peoples who are on Google+ Social Network. Its a free marketing tool of your content which will promote your blog over the internet rapidly. 

So make sure you enabled it and whenever you Press Publish a new post the following Share on Google+ the following screen will appeared and here you will type some comments for your potential readers. Your post title with a short description will be displayed automatically and in To You can add more people, friends or family members in addition to Public or you can choose only selected people and can remove sharing with Public by clicking on the cross option. Finally at the end you see a Share button so press it to done all. 

Sharing a blogspot post with Google+ Social Network

When someone on the web visit your blog post, your traffic rank will be increased and these peoples will be consider users of your blog. If you select quality and unique and sufficient contents for your each and every post and will keep continue posting then your blog Alexa ranking and earning will be boost and no thing will be deterred in the promotion of your blogspot blog or any other site. To know about Google+ public profile benefits and to learn how to create it lets visit our post Create Google+ Public Profile to connect with World. Once you published, you will be directed to list of post which is explained below.
 

View Index of Published Posts on Blogger Control Panel

List of all published posts will be founded in the blogger dashboard panel with name Published under the Heading of Posts. In fact Google blogger automatically take you after you press publish button at the end of writing and completion of a blogpost and users see the following screen once a blog post published successfully:

View list of published posts in Blogger Control Panel

You can edit, update, view, share or delete your single or many posts of blogger without any prohibition. Moreover you can switch to draft which make blogspot a most flexible free blogger for learners. To view your post how it will be look to users click on view option given under the every post and make some re-editing or update if required. Lets view here preview of our sample work test post. This blog was created on our choice Blogger Notable Theme which is free of cost. Once you done now work on promotion, marketing and adopt proven techniques to increase blog readers because even best posts and content remained unnoticed if we can't properly apply strong SEO and marketing optimization. So share your content on popular sites like Facebook, twitter and LinkedIn etc. 

Post Setting, Labels, Schedule, Permalink, Location, Options, Custom Robots Tags


I will say these are optional things for beginners. On the Right Side you will see Post Setting which is not recommended if you don't know basic SEO advantages and techniques of enabling Blogger SEO Tools. So just leave it now and after posting 25 to 30 posts in your blogger study and research about SEO Tools & Techniques and get excellent information from our post Blogger Search Engine Optimization Easy Tips for Higher Earning. Then come back and apply these advance features for all of your published posts. Actually these tools are used to increase your blog traffic which means higher chances of earning more if anyone applied google AdSense, infolinks or other money making advertisements or referral links on your blog. AdSense and others Tools required your simple attention and with efforts of few hours to days. We shall also discuss these tools at later stage and will explore more in detail. 

Saturday, June 10, 2017

Blogger Search Engine Optimization Easy Tips for Higher Earning

To help you to bring more visitors on your blogger site, Google BlogSpot is now fully equipped with powerful new SEO Tools (like Robot.txt, Writing a Meta Tags Description, Enabling Custom Robots header Tags, 404 error page custom message editing) are some examples  of advance Search Engine Optimization (SEO) options that make Blogspot SEO friendly and a best choice that enable you achieve your goals and targets i.e. earning more money by increasing number of visitors and traffic for your blog. These tools are also help you to bring your blog on the top in search results show by search engines like google, Ask or bing etc. To become a professional blogger and an expert SEO, you must be know enough to work on these options in a smart way.

In the below mentioned step by step guide, we will try to help you to understand and apply important features of blogSpot search preference settings options into your own blog (s) to get maximum traffic, higher ranking means on the first page which obviously leads to more clicks and higher income. Let discuss each option in detail and practical way. But be careful because incorrect use of these features can result in your blog being ignored by search engines, this warning is also highlighted on search preferences screen.

Login into Blogger Dashboard to Enable SEO Advance Setting

To enable the new SEO setting, you need to login as Admin into your blogger dashboard by accessing blogger.com. Now the below dashboard screen will show on your screen:
Find Setting Option


Don't worry, if you not have any blog, then create one following the instructions mentioned in onlineship post "Make a Free blog step by step"

Meta Tags (Blogger)

To enable advance SEO settings on blogger click on Setting> Search Preferences > Meta Tags "Enable Search Description" Yes. This is well explained through following screenshots:
Search Preferences Options

On clicking on (yes) a blank box will appear and here you have to write a brief description or summary about your blog help online people that what type of content is available on your blog and meets the needs of related users. So type it very carefully specifically and up to 150 words. An example is showing below:
Writing a Snippet Search Description

This feature is great to help you to increase number of visitors and helping search engine to bot crawl your web blog for proper indexing and displaying your blog information in search results. So always choose right keywords that best represent your blog data.

Errors and re-directions Blogger Features

If you have changed a page URL or deleted a post (s) or a user given an incorrect URL of your site/blog then they will view a generic message like "Sorry the page you are looking not Found" This diverts users attention from your blog but using your creative mind and SEO Advance Setting options, you can fix it in a handsome way. Lets learn how:

Apply Setting Custom Page Not Found in Blogger

Blog owner can do this by Editing the custom page not found setting option in setting>search preferences>errors and redirection>custom page not found.  These features help readers to view a customize HTML message to set the 404 error page not found setting which is very important to avoid loss of potential users or declining traffic graph & ranking of a blog/site.

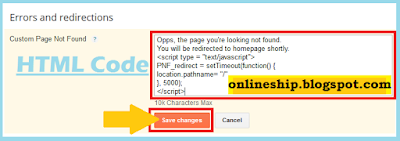
So lets work on it,  by default Custom Page Not Found Option is Not Set and we have to Set it by clicking on Edit.  The blank box is for customize HTML message which will be displayed in case any thing went wrong.
Custom Page Not Found Setting

You can design HTML+CSS codes to give your users a better experience & look. There are different HTML codes can be designed depends on your choice to redirect users on homepage, on search box, on recent or popular posts of your blog. It is recommended that you choose Homepage redirection HTML code as applied and can be viewed in below screen:
Edit Set HTML Code

To check the things applied properly, type anything incorrect in your blog URL address in a browser, you will view customize error message and look like this:
Blogger 404 error page not Found

and in a short while users will be redirected to your blogger home page similar to this one which is a sign of your successful implementation of error page setting. Congratulations, you done it
Redirect to Homepage

Setting Custom Redirect Features in Blogger

An other important option of under "Errors and Redirections" Tab just below the page not found is Custom Redirects for individual deleted/updated URL pages or posts. This feature is useful when you are planning that instead of reaching on default homepage in response of 404 error page, users directly reach on the right and specific page that's previous URL address was changed, deleted or updated. In this case you should use custom redirect option for one or more pages to help your users to reach on what they are looking over there. 

For example we have an old post "Create your own blog" with URL http://lbsfree.blogspot.com/2017/03/create-your-own-blog.html and due to any reason its URL address changed or the post deleted and now you want that users when access this URL will automatically redirect to a specific new post title (How to create a free blog on blogspot) URL address i.e http://lbsfree.blogspot.com/2017/03/test-post-how-to-create-free-blog.html instead of previous page no more searchable.
Setting Custom Redirects in Blogger

To set these features, you will click on Edit and type in FROM (old) URL but keep in mind that you will only give second part of an old post web address (For learning, if we apply it here from above example you need to type only /2017/03/create-your-own-blog.html). The reason is simple because blogger automatically include first part of URL which is your blog address. Now you need to type the new URL address in To  likewise only type second part of new URL for example /2017/03/test-post-how-to-create-free-blog.html. After that check on Permanent and click on Save. To complete this action finally click on Save Changes. 
Edit Custom Redirects

The result page will look like this, you can check it by giving the same URL as reflecting in following redirected Home webpage:
An example of Redirected URL to Homepage

If you want to add more page (s) redirection click on New redirect and repeat the process explained above. You can edit or delete these options any time. Google web Master tools help you to locate all error pages and by applying fix or a redirect URL you can received more traffic and satisfied users.

Crawlers and indexing

These features are very important and useful and enables you to make your blog to show on top in google and other search engines results by using relevant keywords in titles and text of posts or pages and listing the blog on search engines, if you used these options correctly as incorrect applying changes here can affect inversely and search engines can ignore your blog.

Custom robots header Tags

Google robots frequently crawls the web and look any updated content on any site. Robots then share this information with search engines so when users across the web search some related contents your site show them on the search results. Below you will learn how to enable Custom Robots Header Tags to increase your blog/site visibility for the search engines in the following steps:

Go to the Setting after login into blogger. On the right side below the crawlers and indexing option you will view Custom robots header Tags in disable status by default so click on Edit.

and press Yes finally press Save Changes.  Now perform to click on the right Checkbox as in Homepage, Archives and Search Pages, Defaults for Posts and pages as explained in below screen:


Custom robots setting is very easy as I explained above, using these techniques search engines will prefer to crawl and index your site contents and new updates which will bring your site content on the top of the search results with conditions that your site is fulfilling all basic requirements and have sufficient and genuine contents.

Conclusion

Online earning can boost if you enable these advance SEO blogger tools in your blog and your blog traffic and users will be increase because search engines shows your site or blog on the top of the search results. However bloggers should use these Search Engine Optimization Tools like Robot.txt, Writing a Meta Tags Description, Enabling Custom Robots header Tags for default for post and pages/archive and search pages and for homepage tick the accurate check boxes all, noindex, nofollow, none, nosnippet etc, and designing a 404 error page custom message editing). Why care is important? because doing anything wrong in blogger SEO setting will result opposite and your blog may be ignored by search engines and ranking of the site will be decreased by the time. So learn and apply all advance SEO blogger tools with full of attention. 

Sunday, March 5, 2017

Create Google Plus Public Profile to connect with World

To reach maximum readers and as a successful blogger, you should make a smart profile for your online identity for google properties and as a reference for your readers and to access, react the shared stuff by other users. By default Google Account Profiles setting have two options which is used to share your information with online readers. These two options of making a online profile are "Google+ Profile and Blogger Profile" options are famous. Here we discuss and focus on Google+ Profile, which is official social Network of Google. Let elaborate its advantages, method of creating Google Plus profile. 


No. 1 Advantages of Google plus public profile

Simply speaking Google+ is basically a social network of Google like other social networks i.e. Facebook, Twitter, Linkedin. There are many reasons people across the globe prefer to create Google+ profile to achieve their business goals by reaching maximum people. Google+ is a great marketing and web optimization tool that enable for the promotion of your product, service and contents and engaging your target audience. In addition on home stream of Google+ you meet with new peoples by viewing their shared posts, here have option to join new communities, follow other users profiles, collections depends on your choices. When you follow some users their posted content will be appear on your home stream of google plus and you can +1 to follow it, comment on any post, share it again in your circles like friends, teachers, students or family as many as you want with separate lables, create a new circle and add and remove users in it any time, can see people in your circle, control content, post, a collection you shared with people you recommend, and even mute, block or report option made google plus very user friendly. Simply Google plus connects you with the entire social world and according your choice & convenience. Historically google introduced Google Buzz and Google Wave networks. Google plus is a public social network that give everyone independence to join it free and anytime.

No. 2 How to Create a Google+ Profile

You should visit homepage of Google plus which is https://plus.google.com/ after the page is opened in browser on the right side click on Sign In with your Google Account user ID and password. Look carefully on the left side just below Collections and click on G+ Join Google
How to Create Google Plus Profile

when you will click a popup screen as showing in red in above picture with a message "Now create your public Google+Profile" and Boxes for your first and last name, gender selection and date of birth already filled will be displayed so Re-edit data if you want to any change in already filled information. Keep in mind that whatsoever information you choose here will be shown in all google services like gmail, blogger, drive etc and your readers can view this information as well. In final you will click on Create Profile Button to complete the process. Done.

Google+ Profile Setting


Google plus pubic profile account is best choice with option of creating your circles and google plus will suggest you recommended users like your family members or friends who already using Google+ based on your interest so you can join and enhance your social connections. To find more users there is search bar option in google plus profile once you find just press Add to circles. To enable others to know who you are? You should update all or some information in your google profile like Profile photo, tagline, employment, education studies, scrapbook optional to share pictures with your friends, family and colleagues. Moreover in about page you can write a message, intro anything you like to add. In the bragging rights, places you lived, occupation and interestingly you can add name of your other social profiles facebook, linkedin, your websites or blogs or other links that you want to share in your circles.  You can utilize your Google+ profile by posting and sharing your stories in your circles or even outside with every one and to do so,  use post settings as viewable by the public and +1 notifications with your name keep you update when somebody comment or add you in their circles.  

Creating a Limited Blogger Profile

Keep in mind that you are using blogger platform and First time creating a new blog, the following Profile Options screen consisting Two options i.e. Google+ Profile or Blogger Profile. Remember this screen will only show in front of you when you are login first time in blogspot. So you should decide here to choose between these two options. If you not like to create Google plus profile then simply choose Create a limited blogger Profile as a pseudonym.

Create Google Plus Account Using Blogger Control Panel

To login into google plus account or blogger you need a google account ID, which is compulsory. You can make it in few and simple steps as it is very easy let see and Learn to Create Google Gmail Account Free and Easy Process. The online earners strongly needed google plus profile and to earn a real income online it is recommended you should start working on blogspot which gives opportunity to make a free blog and optimize it with google Adsense and other income providers plate form. If you want to know about it read this post (Make a free blog on Blogspot Step by Step). Onlineship blog is a place where you get such a fruitful and technical post that makes you a practical earner and a successful entrepreneur.

Friday, March 3, 2017

Learn to Create Google Gmail Account Free and Easy Process

To send or receive emails is common nowadays, Gmail, Yahoo, Outlook are some popular email account services offer to create free email accounts. Here we discuss about Gmail and this service have a lot advantages including a lot of free storage facility, powered by google being it's product, fast accessibility and more than all features its totally free. So let me explain how to create an email account on Gmail:

No. 1 Thing to access Google Account Page URL

Simply, address of google account page to create a gmail account is https://accounts.google.com/ when you try to reach on given URL address, the following screen will be appear:

How to Create a New Google Account

Just click on create account as indicating with arrow in above picture, and follow further instructions given at No.2 and note that a single google account is sufficient for all google products.


No. 2 Fill up Profile data


Here you are required to type/enter (in Blank Boxes as shown in below picture) your profile data including first and last name, username id and password, data of birth, gender, mobile no, any existing email address, location (country). Create a unique user id and strong password and write down both in a dairy book and keep it safe. You will fill the following form:


Sign up for Gmail Account

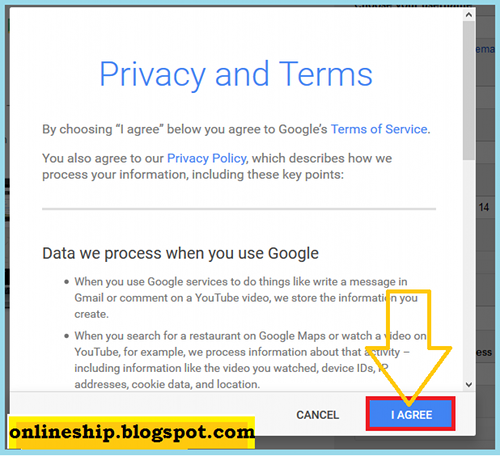
In account its optional whether you want to enter or not your mobile phone number and current email address. Once the form is completed and you pressed Next Step button, the popup window of Privacy and Terms will be appeared like showing here:

No. 3 Accepting Privacy and Terms

Here google display its privacy and terms policies about using google products and services and explained liabilities, claims, warranties, instructions about account safety and password confidentiality etc.
Privacy and Terms to Create a Google Account
Once you satisfied and willing on given policies, now pressing I AGREE means that you are accepting described policies of using the Google account. 


No. 4 Finally Account Created Congratulations!


Now you will see some welcome windows and to go into your mail box you will have to repeatedly press some Next button and the final screen showing Inbox and Compose options and will look like this:


Gmail Inbox and Compose Window View

Congratulations! Google Account created if your screen looking like above picture, now enjoy a lot of Google Products like Gmail services, YouTube, Google Chrome, Google Play Store, Google Search, News, Drive, Calendar, Google Plus, Photos, Google Translate, Blogger, Google Adsense, Books, Docs and many more. 

Related Stuff

You may also like to create a New Blogger to share your ideas, pictures, articles, and posts and looking to earn money with Blogger. So you need to read this post Start your Free Blog Today. Great you can use your google account ID to login into Blogger website and start a blog free of cost and on the topic of your choice. Obviously you will look for strong social networking web optimization tools to increase your readers and for this purpose touch this thoroughly Create Google Plus Public Profile to connect with World to enable your blog site users to share your contents in their circles, react or follow with a single click. Onlineship post (Search Engine Optimization Easy Tips for Higher Earning) for blogger is also a challenge we tried to make it friendly for beginners to learn and apply blogger SEO tools. So try it also to boost your real online income in short time and quickly.

Wednesday, March 1, 2017

Make a free Blog on Blogspot Step by Step

I was excited to start a new blog but at the same time I was thinking that it would be hard and so tricky but when I started to create my first post by using blogger.com, it make me surprised that it is so easy and so simple. Therefore, I recommend everyone to choose and use blogger platform if you are looking for any free of cost web blog, like to earn money online without any investment, want to utilize time in productive way, have basic computer skills, knows simple internet using techniques like browsing, google searching, online reading and writing skills, learning attitude, detailed oriented and so on. Let start towards to "create a free blog in simple steps" with the help of practical actions and sample pictures.

No.1 Access blogger website address


Simply the address of blogger is (www.blogger.com). The following window will appear on your screen when you access this address:
Create a blog on Blogspot

No.2 Login blogger with Gmail ID

As guided in above snap through an arrow, click on create your blog. Keep in mind that blogger is also a product of Google and obviously you need a Google gmail account ID always to login into blogger dashboard. So login with your existing gmail account ID and password. If you don't have the account create it now, don't worry even you don't know because I have also written an article on How to create a Gmail Account in simple Steps so by reading it you will be made an gmail account easily and perfectly.

Enter Google Account email ID

So to signing in the blogger, you have to type google account ID/user name and keep it mind that typing @ gmail.com is optional and not compulsory. Once you entered your ID again review it to make sure it is accurate. Now you need to press Next button as demonstrated in above picture,on clicking on next button another screen looking same will be displayed and here you will required to enter your correct password.

Enter gmail id password to Sign in for Blogger

A Good tip 

It is optional to check Stay signed in If you not like to enter again and again password but make sure that you are using a trusted device which is not in use of another user but if you think the PC/laptop or Device you are going to use is not safe than not use this option.

No.3 Confirm your Profile

A welcome to blogger screen will reflect after successful login into your blogger account, here you have two options regarding displaying your profile, name (identity) for the readers of your blog. In these two profile options the first one is:


Google Plus Profile or Blogger Profile Setting


Google+Profile (which is recommend if you want to connect with readers by sharing your information, permit them for further share your posts online and on Google plus to grow number of your online followers). It is strongly recommended to create and integrate your blog with Google+ plus profile which gives you many advantages and guarantee of readers growth, increase in blog traffic.  The other one is Blogger Profile (which is recommended if you prefer to be a pseudonym hiding your identity).  To learn more about Google plus public profile and Blogger profile lets read our post here (Create Google Plus Public Profile to connect with World).


Creating a new Blog after Login into Blogger

Now you will view a screen as reflecting below with options to Create New Blog so click on it. You can use create new blog option from two location i.e. on left side drop down menu showing word New Blog or a button in the central position at the bottom side of the current page which will look like this:

Create new Blog First Time

Giving a Title and Web URL address for Your new Blogger's blog

After you press the option of Create New blog a new window of Blog List>for creating a new blog will be showed. Here you need to give a unique title and URL address (if the web address will be available then blogger show you a tick box with wording "The blog is available", or Sorry, this blog address is not available. So you can select a name of your blog which is available. Once the URL is selected now choose a theme from various beautiful blogger templates. Try to explore all themes to give a good look to your blog. In below example we select notable theme of blogger as in below picture.


Moreover if you want to browse more themes for your blog you can add it future. Now and finally click on Create blog. Congratulations you have successfully created a free blog on blogspot. Once you created a new blog start creating new posts and start publishing over the internet to share with the world or to limit it to yourself or with those you will allowed. These and more features make the blogger a unique plate form for peoples like you. Again remember its free, easy to set up and give you a smart way to earn a decent income online with passion and hard work and monetize your blog with AdSense, infolinks referral programs and other plate forms as well. You can also explore other ways to earn online including banner ads, affiliate marketing, product reviews, online selling some products. Be remember you always have an option to add a custom domain later. Like that if you want to change the name of your blog or URL address its also possible which can do at lager stage.

Conclusion


If you successfully learn how to create a free blog than everything explained in this post is possible so to go further make sure you learned and you have your own blog. Click here to learn how to create new posts and publish it over the internet and to get maximum benefits from your blog by Enabling Blogger advance SEO tools see here how